Creality Ender 3 series are very popular entry-level printers, and only require a small amount of assembly and adjustment to achieve some pretty nice printing results. To make the printer be compatible with more filaments, I made some modifications to the printer, and I will share them in this blog.
There are two main modifications: dual z axis and voron afterburner print head.

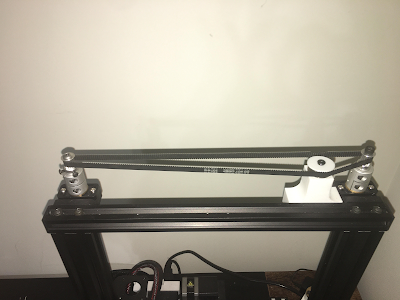
1. Dual z axis
The reason why we need dual z axis is we need to make the x axis parallel with the heat bed as much as possible. Even if you adjust the single z axis that the printer came with to the best condition, you can still wobble the other end of the x axis slightly. It is okay when we are using the original print head, but if we add a heavier direct drive print head, it may have some bad effect on the print.
I tried to avoid adding new motors to the z axis because you need another limit switch which makes things so much harder. I bought a bigger motor for the z axis and used 2gt timing belt to transmit the power to the other screw rod. When the belt is properly tightened, it can keep the two screw rod synchronized all the time, even when the printer is not plugged in, so we don't need limit switch anymore. Adjustments are required because the two screw rods need to be as parallel to each other as possible. The screw rod the printer comes with does not have support on the top, so it is okay for it to tilt a little bit since the nut will correct the position eventually. But now, there is a support because if there isn't we can't make the belt tensioned all the time, so making the two rods parallel to each other is crucial to the printer.
I found a suitable modification in Thingiverse: https://www.thingiverse.com/thing:3746653
But I only used the file below from it, because I don't want to shorten the z axis maximum height. And the bearing mount is not strong enough to me (probably because I am using normal PLA filament). To mount the part below, some long m5 screws are required, because the original screws are not long enough.


I found this part from Taobao. It is an adjustable bearing mount. I use them to replace the 3d printed ones.

Then it is the belt tensioner. Because the two shaft is fixed so I can't get the belt tensioned by adjusting the distance between the two shafts like the x&y axis. I have to add a tension wheel between the two shafts. The closer the tension wheel is to one of the shaft, the more tension there is in the belt.
2. voron print head
If you want to keep the x axis original rail, you can use this file from thingiverse: https://www.thingiverse.com/thing:4614384
If you want to use a linear rail, you can use this one: https://www.thingiverse.com/thing:4572984
It probably will work with the print head of voron switchwire, but the original belt might be a little bit short.

Those modifications makes the printer compatible to more filaments, and largely avoids the risk of clogging. Especially when I am printing TPU filaments. Before the modification, low printing temperature and high speed can jam the extruder. But now it can print at a lower temperature and at a higher speed.
I will make some further modification to the printer. I am planning to add belt driven z axis, linear rails for every axis and the new voron stealthburner print head. Hopefully it can make some further improvements on the pricision and speed of the printer.
Comments
Post a Comment